

Installing CUDA and cuDNN in Ubuntu 20.04 for Deep Learning
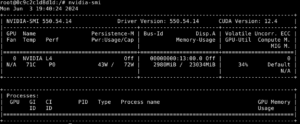
A snapshot of the GPU hardware details from the “nvidia-smi” command output.
FYI: This guide is also compatible and has been tested on Ubuntu 22.04.
Two important tools made to capitalize on GPU acceleration for deep neural networks are the NVIDIA CUDA Toolkit and the NVIDIA CUDA Deep Neural Network library (cuDNN).
The CUDA Toolkit, a development environment for creating GPU-accelerated apps that run on NVIDIA hardware, is utilised by the primitives in the cuDNN library.
We presume that you have a fresh Ubuntu installation and some basic experience with running commands in Bash. This instance does not cover any optimizations or customizations.
If you run into any problems during the installation, please don’t hesitate to comment.
Having said that, this is how to install cuDNN 9.8.7 and CUDA Toolkit 12.2 on Ubuntu 20.04 .
If you want to use Docker, pull the Docker image using the below command:
$ sudo docker pull nvidia/cuda:12.0.1-runtime-ubuntu20.04
Check if the Docker image is installed and get image details:
$ sudo docker images
To run the Docker image:
Replace <IMAGE ID> with the image ID that you got from the previous command.
$ sudo docker run -it –gpus all <IMAGE ID> bash
Once you are inside the Docker environment, clear up the pre-installed Cuda version.
To do so, follow the below mentioned steps:
$ cd usr/local/
$ rm -rf <folder name>
Pre-Requisites
Let’s start:
Make sure your NVIDIA hardware is CUDA capable first. Use the following command to accomplish this, and look for an output that resembles this one:
$ lspci | grep -i nvidia
13:00.0 3D controller: NVIDIA Corporation Device 27b8 (rev a1)
Next, navigate to your home directory, install the Linux kernel headers, and update the package manager’s state:
$ cd ~
$ sudo apt update
$ sudo apt upgrade
$ sudo apt install linux-headers-$(uname -r)
Download NVIDIA CUDA Toolkit:
Open the cuda-downloads link https://developer.nvidia.com/cuda-12-2-0-download-archive and choose Linux > x86_64 > Ubuntu > 20.04 > runfile (local). This should be the suggested command that appears as a result:
$ apt-get install wget
$ wget https://developer.download.nvidia.com/compute/cuda/12.2.0/local_installers/cuda_12.2.0_535.54.03_linux.run
Disable the Nouveau drivers:
The next step is to disable the Nouveau drivers, which are installed by default on most Ubuntu installs and interfere with the CUDA installation process.
Make the following file at /etc/modprobe.d/blacklist-nouveau.conf to accomplish this:
blacklist nouveau
options nouveau modeset=0
And regenerate the kernel initramfs:
$ sudo update-initramfs -u
Reboot your device so the Nouveau drivers get unloaded.
Install the NVIDIA driver from command line:
Check the available drivers for your hardware
$ sudo ubuntu-drivers list
You should see a list such as the following:
nvidia-driver-470
nvidia-driver-470-server
nvidia-driver-535
nvidia-driver-535–open
nvidia-driver-535-server
nvidia-driver-535-server-open
nvidia-driver-550
nvidia-driver-550–open
nvidia-driver-550-server
nvidia-driver-550-server-open
Installing the driver
You can either rely on automatic detection, which will install the driver that is considered the best match for your hardware:
$ sudo ubuntu-drivers install
Or you can tell the ubuntu-drivers tool which driver you would like installed. If this is the case, you will have to use the driver version (such as 550) that you saw when you used the ubuntu-drivers list command.
We have installed 550 driver:
$ sudo ubuntu-drivers install nvidia:550
Use the nvidia-smi command to confirm that the NVIDIA driver is installed and operational:
nvidia-smi command result
Install the CUDA Toolkit
Run the installer and update the shell:
With everything ready, let’s begin installing the CUDA Toolkit.
Execute the subsequent command to install the Toolkit directly without the need for extra tools, like the driver (which is already installed).
$ apt-get install libxml2
$ sudo sh cuda_12.2.0_535.54.03_linux.run –toolkit –silent –override
Check that the library files exist as indicated in the image to ensure that CUDA was installed correctly:
![]()
Checking CUDA files
To open file in command prompt:
$ apt-get install nano
$ nano ~/.bashrc
Adding these lines at the end to the shell:
# NVIDIA CUDA Toolkit
export CUDA_HOME=/usr/local/cuda-12.2
export LD_LIBRARY_PATH=${CUDA_HOME}/lib64:$LD_LIBRARY_PATH
export PATH=${CUDA_HOME}/bin:${PATH}
And resource the file to update the current terminal session:
$ source ~/.bashrc
Check Cuda installation
It is advised to test the installation before proceeding with the cuDNN installation.
Use the following command to make sure the driver version that is loaded is the proper one:
$ nano proc/driver/nvidia/version
![]()
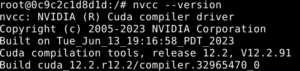
Verify that the compiler is installed with nvcc — version:
Now, use Git to obtain the CUDA Samples repository from GitHub (run $ sudo apt install git if it’s not already installed):
$ git clone https://github.com/NVIDIA/cuda-samples.git
Next, locate the deviceQuery utility’s directory and compile it:
$ cd cuda-samples/Samples/1_Utilities/deviceQuery/
$ make
Once it has been compiled, run it:
$ ./deviceQuery
This output, which shows that CUDA is correctly installed and operating, should appear to you.
./deviceQuery Starting…
CUDA Device Query (Runtime API) version (CUDART static linking)
Detected 1 CUDA Capable device(s)
Device 0: “NVIDIA L4”
CUDA Driver Version / Runtime Version 12.2 / 12.2
…
Result = PASS
Install the cuDNN library
Refresh the repository metadata:
$ sudo apt-get update
The runtime library, development library, examples, and samples will all be installed. Click here for more details.
Use the following instructions to accomplish this:
$ sudo apt-get install libcudnn8=9.8.7.29-1+cuda12.2
$ sudo apt-get install libcudnn8-dev=9.8.7.29-1+cuda12.2
$ sudo apt-get install libcudnn8-samples=9.8.7.29-1+cuda12.2
Test the CuDNN installation
We will use the mnistCUDNN sample to verify that cuDNN is installed and operating as intended.
Copy the samples to a writable directory, enter it, and compile mnistCUDNN to accomplish this:
$ cp -r /usr/src/cudnn_samples_v8/ $HOME
$ cd $HOME/cudnn_samples_v8/mnistCUDNN
$ make clean && make
Install the FreeImage library with $ sudo apt install libfreeimage3 libfreeimage-dev if you receive an error about a missing or incorrectly configured FreeImage.h.
To test the installation, run the sample now:
$ ./mnistCUDNN
An output similar to this one should appear, indicating that the installation of CUDA and cuDNN is complete and ready for use!
Test Passed!
Clean up
Certain files can be securely removed after installation as we won’t need them any longer:
$ rm -rf cuda-samples cuda_12.2.0_535.54.03_linux.run
$ sudo apt autoremove -y
Sources:
- NVIDIA CUDA Installation Guide for Linux https://docs.nvidia.com/cuda/cuda-installation-guide-linux/
- NVIDIA cuDNN Installation Guide https://docs.nvidia.com/deeplearning/cudnn/install-guide/
Our Services:
Do reach out to us for any AI (Computer Vision) related queries and projects.
Computer Vision projects: https://pixalytix.com/artificial-intelligence/
Check out all the services we offer: https://pixalytix.com/our-services/